Tables Introduction
Many DBMS have a graphic user interface that makes it easier to create tables and insert data into them.
However, sometimes, most often in programs, it is impossible to use graphic user interface and code must be written.
The following table shows some types of information that can be stored in a database and data type used to store it. There are many more types than just these stated here.
| Data we want to store | Type of data that can be used |
|---|---|
| Number | int, bigint, float, decimal |
| Text | char, varchar, nvarchar |
| Date | date, datetime, datetimeoffset |
| Picture | Image |
| Currency | Money |
Every column in a table must have two parts: (1) column name (2) data type stored in a column. Every table can have multiple columns. When we define data type we often use constraints. This is represented as a number in brackets. It means how many digits/letters data can have. For example, char (10) means that we want to store text that has a maximum of 10 letters.
CREATING TABLES
The first step in developing a database is creating tables. This can be done using graphic user interface. However, for this tutorial we will use code.
The statement used for creating tables is CREATE TABLE. The statement is used as follows:
CREATE TABLE “tableName”
(“columnName” “datatype”(constraint))
Multiple columns can be added at once.
Let's create a table we will use in this tutorial. We will use a table that contains information about students in a school. We want to have: name, surname, age, city, main subject. The constraint is the limit of character a word or number can have.
We will start by adding one column.
CREATE TABLE Student
(Name char)
We will get table like this:

EXERCISE:
- Add all other columns into table.
- Set name column to have a maximum of 10 characters, and surname to have a maximum of 20 characters.
- Set main subject to have less than 15 characters and city to have a maximum of 20 characters.
CREATE TABLE Student
(Name char(10)
Surname char(20)
Age int
City char(20)
Main_subject char(14))
INSERTING DATA INTO TABLE
After creating table next step is to insert data into it. Inserting data makes it easier for us later to find what we need. The statement used for inserting data is INSERT INTO. The statement is used as follows:
INSERT INTO “tableName” (“columnName“)
VALUES (“value”)
Multiple information can be added into multiple columns.
Let's add name “Ann” into table
INSERT INTO Student (Name)
VALUES ('Ann')
We will get table like this:

NULL in a table means that there is no data in that field.
Let's add the following student into table: John Smith from New York, age 23
INSERT INTO Student (Name, Surname, City, Age)
VALUES ('John', 'Smith', 'New York', 23)
We will get table like this:

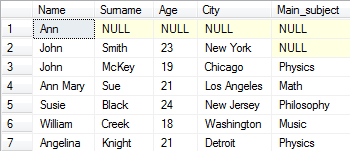
EXERCISE:
Insert the following information into table:
- John McKey from Chicago, age 19 has main subject Physics
- Ann Mary Sue from Los Angeles, age 21 has main subject Math
- 24 year old Susie Black from New Jersey has main subject Philosophy
- William Creek, 18, Washington, Music
- Angelina Knight, 21, Detroit, Physics
INSERT INTO Student (Name, Surname, City, Age,Main_subject)
VALUES ('John', 'McKey', 'Chicago', 23,'Physics')
INSERT INTO Student (Name, Surname, City, Age,Main_subject)
VALUES ('Ann Mary', 'Sue', 'Los Angeles', 21,'Math')
INSERT INTO Student (Name, Surname, City, Age,Main_subject)
VALUES ('Susie', 'Black', 'New Jersey', 24,'Philosophy')
INSERT INTO Student (Name, Surname, City, Age,Main_subject)
VALUES ('William', 'Creek', 'Washington', 18,'Music')
INSERT INTO Student (Name, Surname, City, Age,Main_subject)
VALUES ('Angelina', 'Knight', 'Detroit', 21,'Physics')
READING DATA FROM TABLE
When we are finished with inserting data into a table we often want to read some data from it. The statement used for reading data from table is SELECT FROM. The statement is used as follows:
SELECT “columnName”
FROM “tableName“
WHERE (condition)
WHERE part of statement is used to select only data that meet some condition. It is not needed to use WHERE part if we want to choose entire column.
Conditional selections used in WHERE clause when we work with numbers are:
- < less than
- > greater than
- = equal
- <= less than or equal
- >= greater than or equal
- <> not equal
When we work with text we use LIKE clause. If we want to get all data from a table, we can use character *.
SELECT *
FROM Student
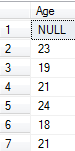
Let's select only age of all students
SELECT Age
FROM Student
Let's select only names of students who are 19 years old.
SELECT Name
FROM Student
Where Age = 19

Let's find all students from Chicago.
SELECT *
FROM Student
WHERE City LIKE 'Chicago'

If we want to get data that begins with specific letter we use character %. If we want all students from city beginning with letter B in LIKE part of a statement we would insert 'B%'.
EXERCISE:
- Select name and surname of all students.
- Select all students from Chicago.
- Select all students younger than 20 years.
- Select city of all students with name John.
- Select surname of students whose name begins with letter A.
- Select all students whose main subject begins with PH.
- Select age of all students where city name begins with “New“
- Select everything but age from students where main subject is Physics.
SELECT Name, Surname
FROM Student
SELECT *
FROM Student
WHERE City LIKE 'Chicago'
SELECT *
FROM Student
WHERE Age < 20
SELECT City
FROM Student
WHERE Name LIKE 'John'
SELECT Surname
FROM Student
WHERE Name LIKE 'A%'
SELECT *
FROM Student
WHERE Main_subject LIKE 'Ph%'
SELECT Age
FROM Student
WHERE City LIKE 'New%'
SELECT Name, Surname, City
FROM Student
WHERE Main_subject LIKE 'Physics'
UPDATING TABLE
Sometimes after inserting data into a table we realize that we made a mistake. We do not want to delete everything what we entered, but we just want to change one field. We do this by using an UPDATE statement. The statement looks like:
UPDATE “tableName“
SET “columnName” = “newValues”
WHERE “columnName”
OPERATOR “value”
Operators used in WHERE is part of an UPDATE statement are the same that we used in WHERE part of the SELECT statement.
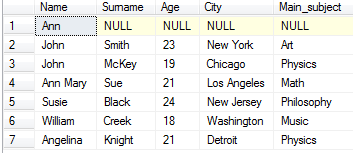
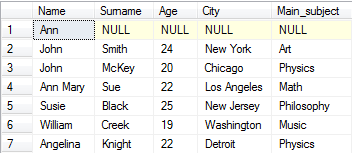
Let's add Art as main subject for John Smith.
UPDATE Student
SET Main_subject = 'Art'
WHERE Surname = 'Smith'
We can update same column for several rows or several columns at once. Let's increase age of everyone for 1 year.
UPDATE Student
SET Age = Age + 1
EXERCISE:
- Susie married William and changed her surname into the Creek. Write this in table.
- Everyone that has surname Creek lives in Washington. Write this in table.
- Everyone who is older than 23 years changed their main subject to Chemistry. Write this in table.
UPDATE TABLE Student

SET Surname = 'Creek'
WHERE Name LIKE 'Susie'
UPDATE TABLE Student

SET City = 'Washington'
WHERE Surname LIKE 'Creek'
UPDATE TABLE Student

SET Main_subject = 'Chemistry'
WHERE Age > 23
DELETING FROM TABLES
Sometimes we do not need some information stored in our database, and we want to delete it. In our case it would be when a student graduates. We can delete data using the DELETE statement. It looks like:
DELETE FROM “tableName“
WHERE “columnName“
OPERATOR “value“
Operators used in WHERE part of the DELETE statement are the same that we used in WHERE part of SELECT statement.
Looking at our table, we see that for Ann we only have name and none of the other data. Let's delete that row.
DELETE FROM Student
WHERE Name LIKE 'Ann'
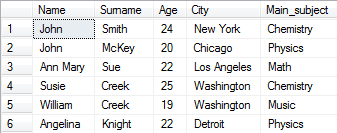
Let's remove all data about persons that have name John or surname Creek.
DELETE FROM Student
WHERE Name LIKE 'John'
OR
Surname LIKE 'Creek'

IMPORTANT:
If we do not put WHERE part of statement all data in the table will be deleted. Here is result of statement DELETE FROM Student

DROPPING TABLE
When we want to remove not just data, but entire table from the database we use the DROP TABLE statement. Here is how the statement looks like:
DROP TABLE “tableName“
In our case it would be
DROP TABLE Student
The difference between DELETE and DROP statements seems small but it's big. DELETE statement removes all data from a table but leaves the table in the database along with all column and constraint definition. DROP statement removes table entirely from the database along with all columns, constraints and any link connecting it.