Creating an Online Users Counter Download Sample Source Code

Greetings, and welcome back to FreeASPHosting.net training with ASP.NET. In this exercise, we will go through the steps of creating an Online Users Counter, which will display the total number of users on your website.
In order to help you get started quickly, we have prepared a “getting started” package, that you may freely download.
First, let’s create a new project. From the menu,
Go to File -> New -> Website then select ASP.NET Empty Web Site.
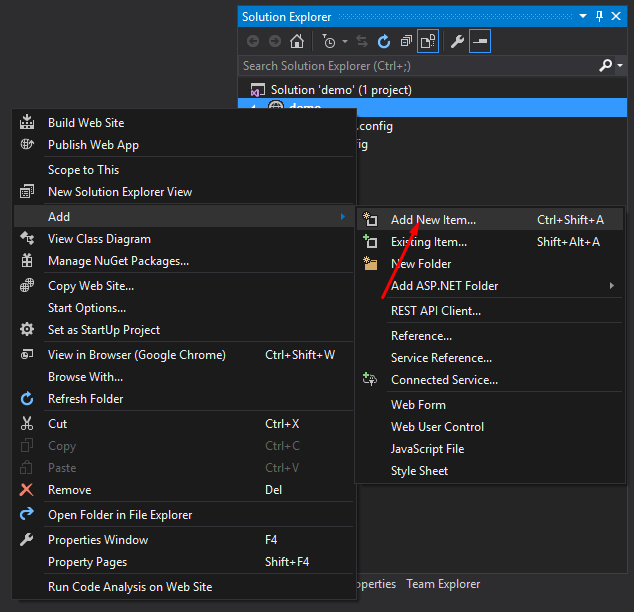
Once the project is created. Right click on it (in the Solution Explorer) and then click on “Add”, then “Add New Item”

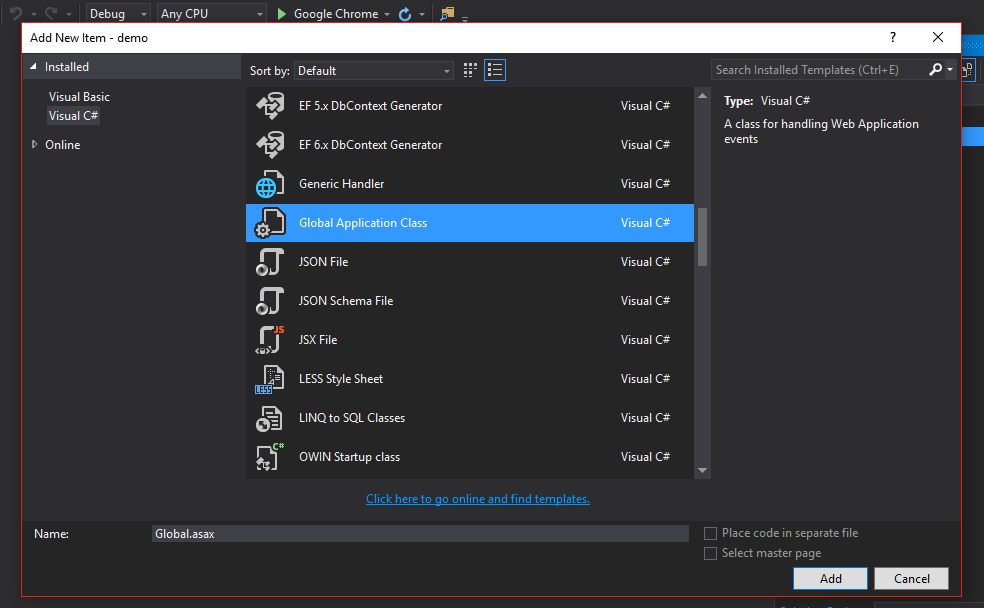
From the Items list, scroll down to “Global Application Class”, select it and leave the default name to “Global.aspx”. Press the “Add” button to proceed.

The Global.aspx class, is a special class in an ASP.NET application. It is responsible for handling system level events. The events list is as follows:
- Application_Start
- Application_End
- Session_Start
- Session_End
- Application_BeginRequest
- Application_AuthenticateRequest
- Application_Error
Application_Start, for instance, and as it’s name explicitly say, is called when the application starts. The Session_Start event however, is called each time a new session is initiated, or in other words, a new user opens the application.
As you may have guessed already, the Session_End event will trigger when a user leaves / ends the application.
Simple enough! We will now put into practice what we have just learned. First, let’s use the Application_Start event to initialize an Application state variable. Let’s call it “TotalOnlineUsers”. We will be using it to hold the number of online users on our website.
On the Session_Start event, let’s add the code that will increment the number of online users, each time a new session is started.
On the Session_End event, we will handle users that leave the application, and thus we need to remove them from the Online Users counter.
         <%@ Application Language="C#" % >

<script runat="server" >

voidApplication_Start(object sender, EventArgs e)
    {
        // Code that runs on application startup
Application["TotalOnlineUsers"] = 0;
    }

voidApplication_End(object sender, EventArgs e)
    {
        //  Code that runs on application shutdown

    }

voidApplication_Error(object sender, EventArgs e)
    {
        // Code that runs when an unhandled error occurs

    }

voidSession_Start(object sender, EventArgs e)
    {
        // Code that runs when a new session is started
Application.Lock();
Application["TotalOnlineUsers"] = (int)Application["TotalOnlineUsers"] + 1;
Application.UnLock();
    }

voidSession_End(object sender, EventArgs e)
    {
        // Code that runs when a session ends.
        // Note: The Session_End event is raised only when the sessionstate mode
        // is set to InProc in the Web.config file. If session mode is set to StateServer
        // or SQLServer, the event is not raised.
Application.Lock();
Application["TotalOnlineUsers"] = (int)Application["TotalOnlineUsers"] - 1;
Application.UnLock();
    }

</script >
As you have noticed, in our Global.aspx file, we use sessions to count the number of online users. This being said, we need to add session’s setup in our application. Editing the web.config file easily does this.
Add the following code, which sets the session state to use Cookies by default (cookieless=”false”), and the default timeout period to 20 minutes.
    <system.web>
	<sessionState mode="InProc" cookieless="false" timeout="20" >< /sessionState>
< /system.web>
Add a webform to the page, then drag and drop a Label control from the Toolbox. Make sure that the ID of the label is “Label1”, since it will be used in the backend code to override it’s content.
        <form id="form1" runat="server"  >
		<div>
		<p >  No. of Online Users:<asp:Label ID="Label1" runat="server" Text="Label" ForeColor="#CC0000" ></asp:Label></p >
		</div >
		< /form >
Now open the code of the page, by opening the Default.aspx.cs file, and add the following method:
        protected void Page_Load(object sender, EventArgs e)
    {
      Label1.Text = Application["TotalOnlineUsers"].ToString();
    }
As you can see, and just like the Global.aspx page, we have used an Event to handle the page loading, in this case: Page_Load. So in this case, each time the page is loading, we will update the content of the counter label, and display the current number of online users.
Just like the application object, an ASP.NET page has a list of events; here are some of the commonly used page’s events:
Now it’s time to run the application. You can do so by clicking on (CTLR+F5). By default, the code will display 1 as the total number of users.
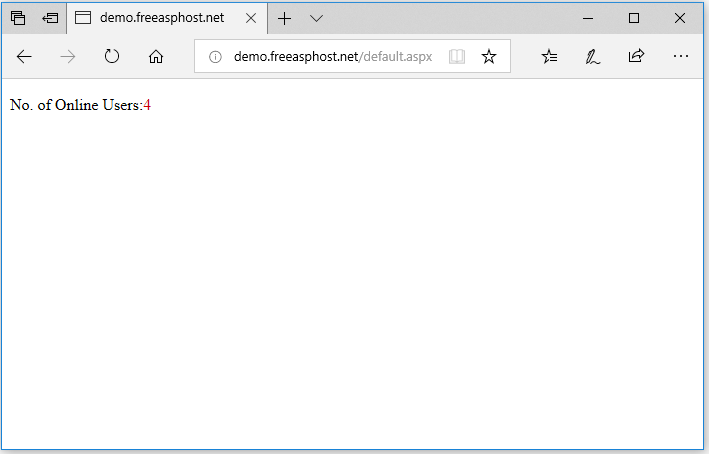
In order to test this, you can copy the app URL (http://demo.freeasphost.net/default.aspx) and open a different browser (or open a private navigation window) and paste the same URL in it. This will simulate a new session and you will be able to see the number of users rising.
When a user visits your website, a new sessions is started and the Application[“TotalOnlineUsers”] variable is incremented by 1. When the User’s session expires, the same variable is decremented by 1.
As you can see in our example below, the code successfully shows the number of users on the application:

It is also possible to use cookieless sessions, by setting the cookieless property, on the web.config file to true. This will tell the application to avoid using cookies to store session IDs. Instead, these session IDs will be transferred through the URL.
If you try it out on your application, each time you will open the app on a different browser, you will notice that the session ID is different.
The session ID is embedded in the URL in this format: http://demo.freeasphost.net/(session ID here)/default.aspx